# Get connected with EPOS Now

<p class="callout info"><span lang="EN-US" style="mso-ansi-language: EN-US;">Before getting started, make sure you have the correct </span>Verofy® Connect<span lang="EN-US" style="mso-ansi-language: EN-US;"> app on your Verofy® Move terminal. If you don't, you can get this added by submitting a request via the message centre in your app or cloud, or alternatively, call us and this be done over the phone!</span></p>

<p class="callout success"><span lang="EN-US" style="mso-ansi-language: EN-US;">For connection to be successful, your EPOS till system and Verofy® Move need to be connected to the same WiFi network, we recommend this is done before continuing. </span></p>

1. <span lang="EN-US" style="mso-ansi-language: EN-US;">To get connected to your EPOS till system, start by heading to your EPOS back office at </span>[<span lang="EN-US" style="mso-ansi-language: EN-US;">https://www.eposnowhq.com/</span>](https://www.eposnowhq.com/)<span lang="EN-US" style="mso-ansi-language: EN-US;">. Alternatively, access the back office on your till system by selecting 'Back Office' from the Admin drop down on your till screen menu.   
      
    ![](https://verofy-2-knowledge-base-public.s3.amazonaws.com/uploads/images/gallery/2024-03/embedded-image-o0rhkopb.png)  
      
    </span>
2. <span lang="EN-US" style="mso-ansi-language: EN-US;"> </span>Once you’re logged into the Back Office, head to the **AppStore** option on the left hand side of the screen.  
      
    ![](https://verofy-2-knowledge-base-public.s3.amazonaws.com/uploads/images/gallery/2024-02/embedded-image-tn2yynhu.png)
3. <span lang="EN-US" style="mso-ansi-language: EN-US;">Search for **PAX Direct Semi-Integration** and select **Set Up** once located.</span>
    
    <span lang="EN-US" style="mso-ansi-language: EN-US;">  
    </span>
    
    ![](https://verofy-2-knowledge-base-public.s3.amazonaws.com/uploads/images/gallery/2024-02/embedded-image-f2nt3nno.png)
4. <span lang="EN-US" style="mso-ansi-language: EN-US;">On the EPOS back office, you need to add your Verofy® Move as a payment terminal. You should name it something easy to recognise.  
      
    </span>![](https://verofy-2-knowledge-base-public.s3.amazonaws.com/uploads/images/gallery/2024-02/embedded-image-hbp5ehld.png)  
      
    Enter the Serial number in the EPOS Now back office and the IP address (e.g., `192.168.1.100:8080`), **excluding the `8080` port at the end**. Enter only the IP address (`192.168.1.100`).  
      
    You can find this information by <span lang="EN-US" style="mso-ansi-language: EN-US;">going to the Verofy® Connect app on your Verofy® Move.   
      
     a. Select the Verofy Connect application from the home screen.   
      
     ![](https://verofy-2-knowledge-base-public.s3.amazonaws.com/uploads/images/gallery/2025-11/embedded-image-tqlse3n6.png)</span><span lang="EN-US" style="mso-ansi-language: EN-US;">  
      
    b. Allow the calls permisison pop-up if prompted.  
    </span><span lang="EN-US" style="mso-ansi-language: EN-US;"><span lang="EN-US" style="mso-ansi-language: EN-US;"><span lang="EN-US" style="mso-ansi-language: EN-US;">  
     ![](https://verofy-2-knowledge-base-public.s3.amazonaws.com/uploads/images/gallery/2025-11/embedded-image-1ocnrpgt.png)  
      
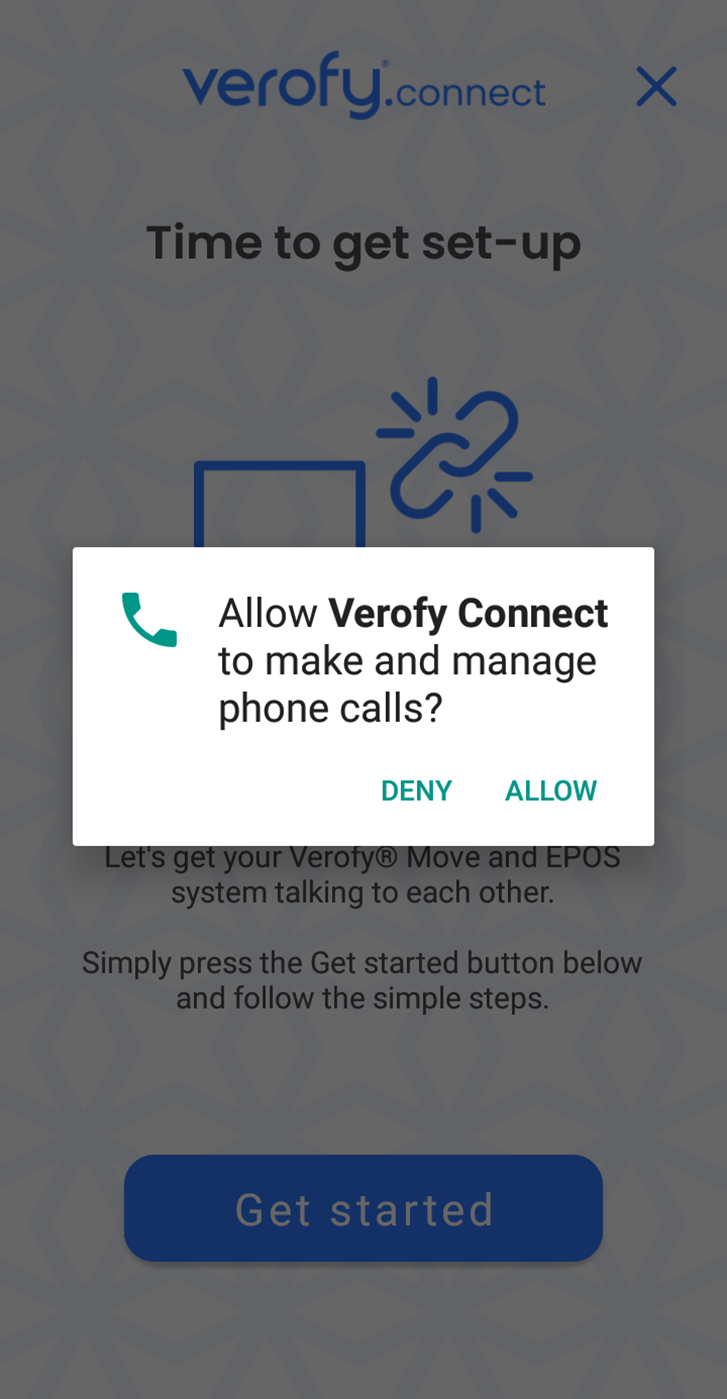
    c. Press **Get started** to locate the IP address.  
     </span></span></span> ![image.png](https://verofy-2-knowledge-base-public.s3.amazonaws.com/uploads/images/gallery/2025-11/scaled-1680-/CAUimage.png)
    
    <span lang="EN-US" style="mso-ansi-language: EN-US;"><span lang="EN-US" style="mso-ansi-language: EN-US;">  
    </span></span>
5. Once you've saved the payment terminal, scroll down to Tender Settings and enter the Tender name. This is what will display as the 'payment method' on the card terminal for this payment terminal. Press save once this has been entered.   
      
    ![](https://verofy-2-knowledge-base-public.s3.amazonaws.com/uploads/images/gallery/2024-02/embedded-image-byefgdcl.png)
6. <span lang="EN-US" style="mso-ansi-language: EN-US;">Open you've added the Verofy® Move in the EPOS Now back office, it's time to pair them up!  
      
    </span><span lang="EN-US" style="mso-ansi-language: EN-US;">To do this, head to your till system or log in to your till back office via browser (by clicking 'Till' when logged into EPOS Now back office (as seen in step 2).   
      
    Within the till system, you'll see a left hand side menu. </span><span lang="EN-US" style="mso-ansi-language: EN-US;">  
      
    Click the Cloud Sync option - this allows the till to see the new payment terminal you've just added.   
      
    ![](https://verofy-2-knowledge-base-public.s3.amazonaws.com/uploads/images/gallery/2024-02/embedded-image-awlkdt7n.png)  
      
    </span>
7. <span lang="EN-US" style="mso-ansi-language: EN-US;">Next, from the same menu, select the **Settings** option, then select the **Payments** tab.   
      
    ![](https://verofy-2-knowledge-base-public.s3.amazonaws.com/uploads/images/gallery/2024-02/embedded-image-r62vvjkb.png)  
      
    </span>
8. <span lang="EN-US" style="mso-ansi-language: EN-US;">If it's not already toggled on, toggle on the **Enable Pax Payments.** To connect your Verofy® Move, press **Pair**.   
      
    ![](https://verofy-2-knowledge-base-public.s3.amazonaws.com/uploads/images/gallery/2024-02/embedded-image-5lfagut6.png)  
      
    </span>
9. <span lang="EN-US" style="mso-ansi-language: EN-US;"><span lang="EN-US" style="mso-ansi-language: EN-US;">The till will then ask for a pairing code. This will be displayed on your Verofy® Move terminal once you press **Pair Device**.  
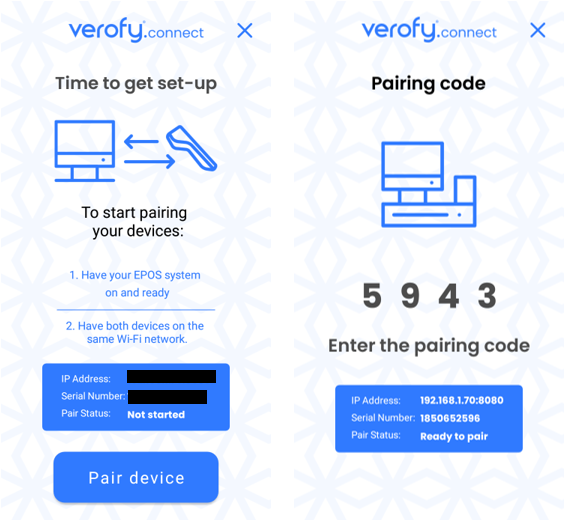
      
    ![](https://verofy-2-knowledge-base-public.s3.amazonaws.com/uploads/images/gallery/2024-02/embedded-image-rsspfyth.png)  
      
    </span></span>![image.png](https://verofy-2-knowledge-base-public.s3.amazonaws.com/uploads/images/gallery/2025-11/scaled-1680-/WOUimage.png)
10. <span lang="EN-US" style="mso-ansi-language: EN-US;">Your Verofy® Move will confirm if pairing has been successful.   
      
    ![](https://verofy-2-knowledge-base-public.s3.amazonaws.com/uploads/images/gallery/2025-11/embedded-image-nv80wt2y.png)  
    </span>

<span lang="EN-US" style="mso-ansi-language: EN-US;">11. Your Verofy® Move will then perform the required configuration to finalise the pairing. Please don't touch the device whilst this is processing. </span>

<span lang="EN-US" style="mso-ansi-language: EN-US;">![](https://verofy-2-knowledge-base-public.s3.amazonaws.com/uploads/images/gallery/2025-11/embedded-image-shyevmoh.png)</span>

<span lang="EN-US" style="mso-ansi-language: EN-US;">12. Once the configuration completes, you'll see the integrated home screen. </span><span lang="EN-US" style="mso-ansi-language: EN-US;">You can now process orders through your EPOS Now till. After you enter the order, press **Pay** then select the PAX option from the selections (this will display as the name you saved for the 'Tender' option in step 5). </span>

![](https://verofy-2-knowledge-base-public.s3.amazonaws.com/uploads/images/gallery/2025-11/embedded-image-2i1udw9d.png) **If you have any problems pairing your <span lang="EN-US" style="mso-ansi-language: EN-US;">Verofy® Move</span> with your EPOS Now till system, please get in touch with our support team who will assist you further.**